After many fits and starts, I’ve completed the second story of the Cape house! I never thought I would type that sentence. The kitchen nearly drove me to drink, but the bathroom…? Good thing its window was too tiny for me to squeeze through and throw myself out only to sustain a head injury and wander cluelessly into the freezing surf of the Atlantic ocean. Truth is, it all came pretty close to being smashed to bits with a hammer on multiple occasions. I even considered subjecting the tiny inhabitant to “powdering her nose” (as she likes to refer to it) in an outhouse and taking sponge baths in the kitchen sink. But now…I’m almost happy with that confounded bathroom!
But let’s start with the bedroom.

Just to recap from about 150 years ago, my darling hubby added a shed dormer to make more living space for bedroom and bathroom…

…then put up the dividing wall. I can’t find any pics of the ensuing chaos and construction/destruction/reconstruction of these rooms, but next steps were the usual floor lay with poster board sub flooring.


Hubby helped me build a closet by enclosing the odd niche under the dormer roof.
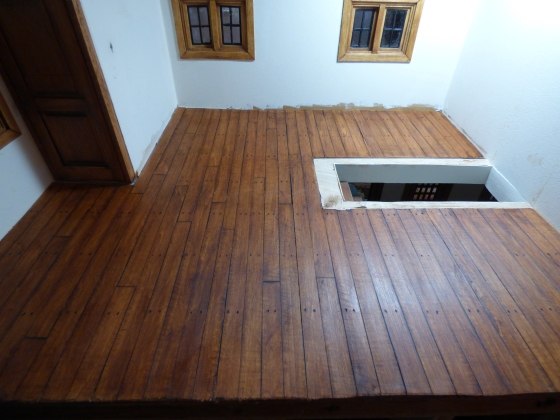
I cut boards from thin basswood and glued them to the poster board, then sanded and stained the floor with Minwax Ipswich Pine. And yes, I drilled tiny holes in the boards and then tapped in a bunch of HO scale railroad “spikes” to simulate the old black nails with rectangular heads that were common back in the day. I never want to see another one of these spiteful little pieces of metal as long as I live. I finished the floor off with some Mylands mahogany wax to age it.

I love these tall baseboards!

I added a threshold between the bedroom and the bathroom tile floor, which is just a tad higher. I tried to make the threshold look as though, throughout the decades, tons of people had been through the door. With full bladders. Hah!

Finally, I cut a hole in the floorboards to accommodate the exposed chimney. I can’t put that in until the part of the roof which it penetrates has been added. I’m sure a good time will be had by all on that particular project.
On to the bathroom!
These little bits of plastic saved my sanity. The shower head was driving me to the brink of madness. I couldn’t find anything that worked. I even bought a shower head with attachment from Marion Russek’s shop on Shapeways. Never one to leave well enough alone, I cut it all into bits for the sake of “realism” and attempted to graft the shower attachment onto a tiny Legos hose. I also spray painted the heck out of them, but Shapeways stuff tends to have this funky texture and the more I sprayed, the worse it looked. Into the bin.
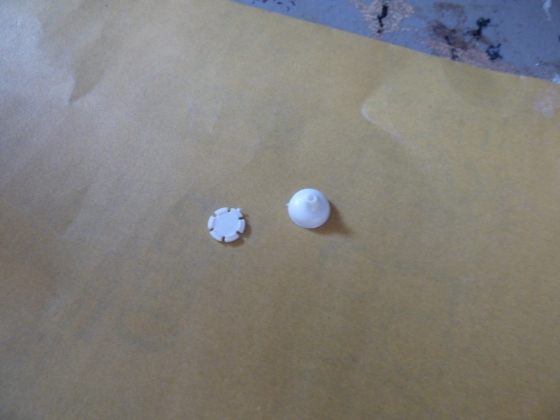
Then I bought a Chrysnbon bathroom kit and found those little doohickeys. What are they for? Beats me! I think one of them is part of a plunger, but the little star like thing – well, your guess is as good as mine. But these bits, gingerly spray painted silver, along with a few other things:

Came together as:
 and then this:
  and
and
I finally got that: 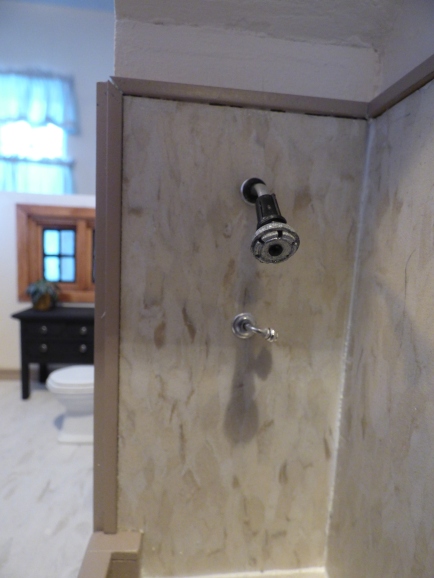
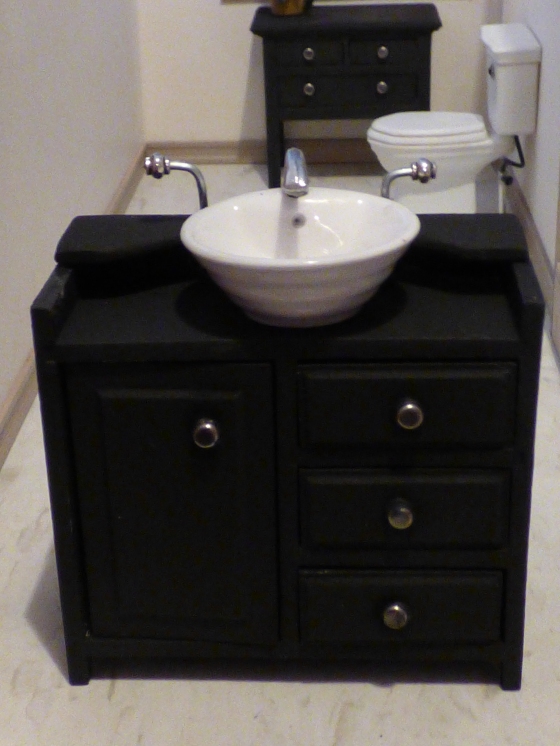
OK. I was on a roll now! Jodi at My Miniature Madness had kindly given me photos of HOM kits she had modified to serve as fantastic bathroom vanities. Scrounging in my stash, I couldn’t find any of the kits she had used, but I did have a dry sink I got as part of a lot. I also had a bowl sink salvaged from my ill-fated ELF Miniatures bathroom kit, which ended up almost as big as a disaster as my ELF Miniatures kitchen unit. Both of these catastrophes dwarfed the sinking of the Titanic. ELF and I DO NOT GET ALONG.
Anyway, I carefully constructed the dry sink, leaving off the decorative panel at the bottom and top, and painted it with black Folk Art Home Decor chalk paint, then used dull silver brads as knobs. I fiddled together some hot and cold water taps that look vaguely like the handlebars of a Harley et voila!
THANK YOU, JODI!!!!!!!!
Next, the shower curtain rod. I had considered doing some sort of “glass” enclosure for the shower, but I was OBSESSED with having a shower curtain. I looked online and found that there are, indeed, curved shower curtains that don’t require being wired to the ceiling. (A nightmare of epic proportions I was totally dreading.) So, with some aluminum tubing and some metal beads, I came up with this:

Working quickly, before inspiration failed me, I cobbled together a shower curtain using a bit of fabric, eyelets and earring wires. The kind that clip. Because I had epoxied the shower curtain into place before realizing I needed some hooks for the curtain. So I had to have shower curtain “rings” that would clip on over the rod. Either that, or yank it out of the wall. Uh, NO.

And here it is, the bathroom with the shower head, the rod and the curtain, as well as the lovely vanity and table:


OK, really, I don’t like the huge hooks and eyelets. So I’ve ordered much smaller eyelets and will have to find another way to hang the curtain. Those big hooks have gotta go! But all in all…I think it came out OK.

Up next: the roof and second floor lighting. Let’s end with a scene of the bedroom with some proposed pallet beds included. I bought 6 miniature pallets from Mini Materials, then cut, glued and reconfigured them into twin beds with short headboards to hold a lamp, pictures, alarm clock, glass of water with false teeth in them, what have you. I stained them with Minwax Dark Walnut, then dry brushed with Waverly Chalk Paint – a color called Agave. I’m not sure I totally like them, at least not in this house. They just seemed quick and easy beds to fall into after a day at the beach. Or crawl into after a night at the dive bar down the street. Decisions, decisions!


Wow! You’ve made such incredible progress especially considering the amount of detail that went into each task!
I love the way the flooring in the bedroom came out. The color is warm and wonderful, and in spite of the trouble and time it took to pound in tiny railroad ties, you’ve come away with a stellar looking room! The closet door is awesome!
I am so glad that you had an HOM kit that worked. It not only turned out marvelous (love the black finish and the knobs) but a dry sink is exactly what an updated cape house should have as a vanity! The ELF sink looks fab with it!
We’ve all had similar failures with the Shapeways faucets :o/ Kristine from Paper Doll Minis says to try printing them in Frosted Ultra Detail for a perfect spray painting surface. I am definitely going to give that a shot!
What you did with the shower head looks great and was a very creative solution! I love the shower curtain solution, too! The whole bathroom turned out awesome and you should be extremely proud of all the challenges you’ve overcome to achieve such a wonderful room!
The pallet beds are such an excellent idea! And they seem to be a perfect solution for the space and configuration challenges for the space. I can’t wait to see them all dressed and ready to dive into after a long day of beachcombing!
Great work!
LikeLike
Jodi, thank you for all your wonderful compliments! You really have helped motivate me to keep slogging! Great tip on the Shapeways faucets – thank you for passing it on from Kristine. I’ll also give that a try as there are so many terrific Shapeways minis. I can’t tell you how relieved I am to get out of that bathroom, and I’m glad you like it. The pallet beds are sorta growing on me so they might be keepers. It was great having you drop by the Cape house – you’re welcome any time!
LikeLike
Great job! You are so darn talented. Thank you for another entertaining installment.
LikeLike
Thank you, Cindy! I always strive to do my very bestest for you!
LikeLike
Wow! I just found your blog. I am impressed. I’m a Kris Compas champion, too. I’d be lost without her. Love your work
LikeLike
Thank you for your kind comments, Roberta! Now I realize now how LONG it’s been since I last posted, so I need to get busy. A lot has happened on the Cape and I’m already starting my Nantucket B&B. Thanks for jogging me out of my rut!
LikeLike